I am excited to tell you that I have built a simple MFC applcation using COM objects, which used to be somehow mysterious to me. The COM objects are created by ATL. Before reading this article, I assume that you have the basic knowledge of COM and be experienced programming in C++. One thing I should pointed out is that I am a newbie of COM and there may be some errors in this article. Still, The reason I write this article is to record my growth of my technical career and share it with you.
First, what is ATL? The MSDN says:
ATL is the Active Template Library, a set of template-based C++ classes with which you can easily create small, fast Component Object Model (COM) objects. It has special support for key COM features including: stock implementations of IUnknown, IClassFactory, IClassFactory2, and IDispatch; dual interfaces; standard COM enumerator interfaces; connection points; tear-off interfaces; and ActiveX controls.
Here are the total steps I have ever taken.
Step 1 Creating the ATL Project
In the Visual Studio .NET 2003 IDE, click New on the File menu, and then click Project. Click the Visual C++ Projects folder and select ATL Project. Type “atltest” as my project name.
Click OK and the ATL Project Wizard opens.
Click Application Settings to see the options available:

And choose the Server type as a DLL. After clicking Finish, The ATL Project Wizard will create the project by generating several files.
Step 2 Add an object to the ATL Project
In Class View, right-click the alttest project. Point to Add on the shortcut menu, and click Add Class.
The Add Class dialog box appears. The different object categories are listed. From the list of templates on the right, select ATL simple Object. Click Open.

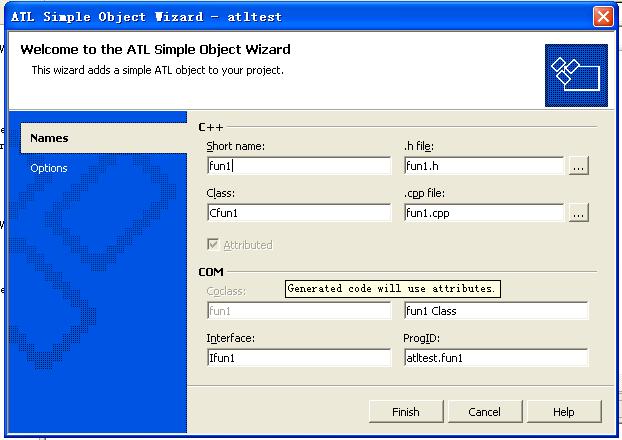
We only need to fill in the short name, and the other fields will be automatically filled by Visual Studio. I fill the short name “fun1”. Please note that the default ProgID is “projectname.shortname”. Click Finish and the interface “fun1” then is added to this ATL project.
Step 3 Add a method to Interface we just created in the last step
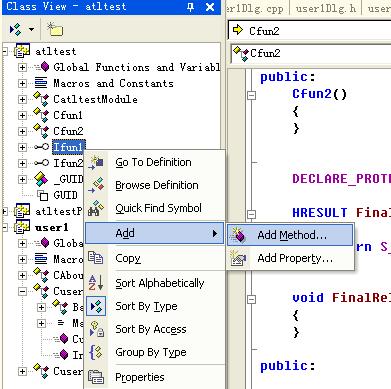
In Class View, right-click the “Ifun1” interface to add a method:

Add the following 3 parameters to this method respectively.
LONG n1, LONG n2, LONG* result
My method is very simple. It just adds the first two parameters — two number and return the result in the third parameter.

The declaration of interface “Ifun1” in file “fun1.h” will look like below:
[
object,
uuid("10E2EB39-791C-4F12-AABF-2F76CD4AE424"),
dual,	helpstring("Ifun1 Interface"),
pointer_default(unique)
]
__interface Ifun1 : IDispatch
{
[id(1), helpstring("method Add")] HRESULT Add([in] LONG n1, [in] LONG n2,
[out,retval] LONG* result);
};
Now add my implementation of the Add method in file “fun1.cpp” :
STDMETHODIMP Cfun1::Add(LONG n1, LONG n2, LONG* result)
{
*result = n1 + n2;
return S_OK;
}
Build your ATL projects now.
We have done the total job of adding a COM objects using ATL. Let’s take a test on it in the next step.
Step 4 Create a MFC applcation to test the COM objects
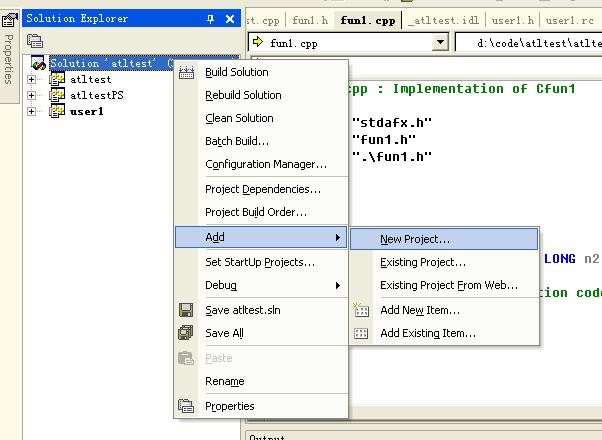
In the above ATL solution, we do not need to close this solution. Instead, we only need to add a MFC project in the existent ATL solution. For simplicity, add a Dialog based MFC application project called “user1”:

You do not know how to create a dialog based MFC applcation yet! Oops… go to MSDN to find the answer.
Now everything is ready. You can use your COM objects now. There several methods to import the COM objects. I use the #import method:
Append the following code fragment in your MFC application’s stdafx.h file
#ifdef _DEBUG
#import "..atltest_atltest.tlb" no_namespace
#else
#import "..atltest_atltest.tlb" no_namespace
#endif
After doing this, add an event handler for the “OK” button to use the Ifun1 COM interface we have designed:
Because we use ATL to build the COM objects, the IDE will register our COM objects automatically. So we just use the registered ProgID “atltest.fun1” to create our interface. In addition, I use a try{} catch() statement to catch the exception when the ProgID has not been registered.
void Cuser1Dlg::OnBnClickedOk()
{
// TODO: Add your control notification handler code here
try{
long nVal;
CString sMsg;
_bstr_t bstr;
Ifun1Ptr spfun1(_T("atltest.fun1"));
nVal = spfun1->Add(1,2);
sMsg.Format(_T("1 + 2 = %d"), nVal);
MessageBox(sMsg,"Call my Ifun1 COM!!");
}
catch(_com_error &e)
{
AfxMessageBox( e.ErrorMessage() );
}
}
Applications must initialize the COM library before they can call COM library functions. So In your MFC application user1.cpp file add the function CoInitialize(NULL); like below:
BOOL Cuser1App::InitInstance()
{
InitCommonControls();
CWinApp::InitInstance();
CoInitialize(NULL);
...
...
}
Now set your MFC application as Startup Project by clicking right button of “user1” project in the solution explorer and build the whole solution and execute it. The following dialog will show up. Click the “OK” button, yep! My ATL COM objects works fine…

hmmm:)
you know I am researching your company by your post
hi wirelesser,
I’m sorry to say that I havn’t used COM/DCOM for a long time, since I’ve changed my job. It was the past for me. I even cannot believe that this article is posted by myself…
hi
COM/DCOM/ are very popular in your company?
is there any other RPC method you are using?
I have tried COM/DCOM several years ago but I thought it is very complicated(especially DCOM).but I noticed recently many high-level remote-call methods were used. such as SOAP,did you turn to it?
what do you think about CORBA?
wirelesser